

This article walks marketing admins through refreshing thumbnail and preview images, generating custom thumbnail images, and uploading custom thumbnails. The same steps apply to both print and social content. Use this guide when thumbnails appear outdated after a branding refresh, when rate or listing flyer previews show no loan or listing data, or when you want to customize the thumbnail shown to end users.
Important: There are no bulk tools or processes to update thumbnail and preview images across the library. You must update each piece of content individually. This is a common question when branding or content block changes have been made.
Choose your path
Before you start, identify which of the three workflows fits your situation. The table below maps common scenarios to the correct path.
| Your scenario | Workflow to use |
|---|---|
| Dynamic branding elements were updated, or a contact block or template was changed, and existing thumbnails are now out of date. | Workflow 1: Refreshing a thumbnail image |
| Your organization has multiple brands and you want thumbnails to display generic or top-level branding rather than a specific sub-brand. | Workflow 1: Refreshing a thumbnail image (using a demo user with the overarching brand) |
| You are working with a rate or listing flyer where the preview in the code editor does not show loan or listing data. | Workflow 2 then Workflow 3: Generate a custom thumbnail, then upload it |
| You have a two-page or double-sided asset and the automatic stacked thumbnail looks awkward; you want pages side-by-side or only the first page shown. | Workflow 2 then Workflow 3: Generate a custom thumbnail, then upload it |
| You already have a custom thumbnail saved as a .jpg under 3 MB. | Workflow 3: Uploading a custom thumbnail image |
Note: Thumbnails must be .jpg files and 3 MB or less. To display generic or top-level branding across multiple brands, set up a demo user with the overarching brand elements ahead of time. You will select that user during the Preview as User step in Workflow 1.
Workflow 1: Refresh a thumbnail image
Thumbnail and preview images update automatically when an admin publishes a piece of content. For content that is already published, unpublish it, confirm Preview as User is set to your preferred demo user, and then publish it again to trigger the refresh.
Navigate to the template
Select Manage Marketing.
Select Manage Templates.
Select Actions on the piece you want to update.
Select Media Settings.
Select Edit Template.
Update the preview and republish
If you are making changes to toggles or configuring the piece, do so now. This includes updating title text, body copy, uploading a new background image, adding or overriding disclaimer verbiage, or any other visual changes that should appear in the thumbnail.
Select the refresh icon to update the preview in the code editor.
Select Preview as User to choose a demo user.
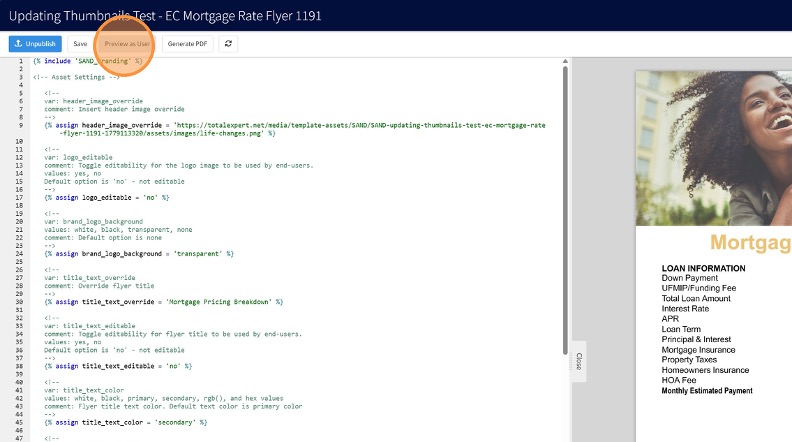
Select the Lender field and choose a user.
Important: Make sure the selected user has the branding elements you want in the thumbnail and preview. The user you choose determines the branding and user information displayed in the automatic thumbnail and preview images.
Select Update Preview.
Select Unpublish if the content is currently active.
Select Publish to refresh the preview and make the piece active again.
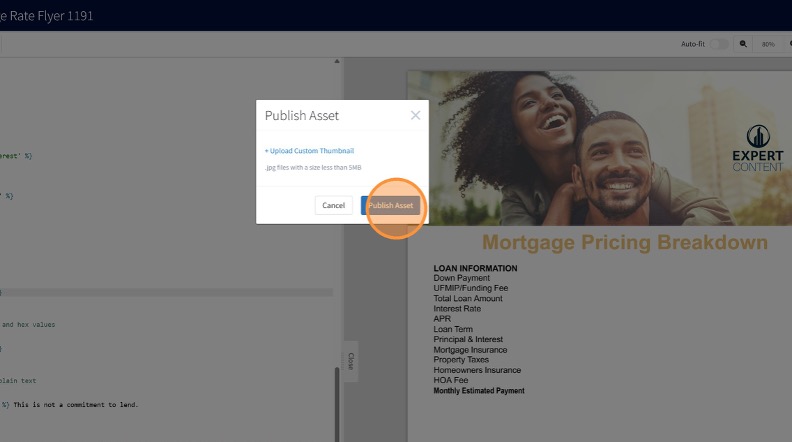
Select Publish Asset. This updates the thumbnail and preview image to match what is currently shown in the preview panel.
Select the X to exit the editor.
Workflow 2: Generate a custom thumbnail image
Generate a custom thumbnail by running the customize-and-publish flow on a piece of content. Once published, download the PDF (print) or PNG (social), and save the result as a .jpg file.
Create and configure the piece
Select Print Marketing.
Select Create New.
Select Actions on the piece you want to use.
Select Select.
For listing and rate pieces, select a property and loan scenarios.
Tip: When generating custom thumbnails for rate flyers, select the maximum number of loan products. This shows end users how many products are intended for each piece and gives them the best visual reference.
Select loan products.
Select Search Rates.
Select the radio button to choose a product for each scenario.
Select Confirm and Create Flyer.
Select Create Flyer.
Publish and download
Adjust any editable fields as desired.
Select Save First Draft.
Select Publish.
Select OK to confirm.
Select Actions.
Select Download PDF (for print) or Download PNG (for social).
Important: Once the PDF or PNG is downloaded, you will need a .jpg version to upload as a thumbnail. Take a screenshot and save it as .jpg, or use a file converter.
Workflow 3: Upload a custom thumbnail image
Once you have a .jpg thumbnail under 3 MB, upload it to the template. The initial navigation mirrors Workflow 1. If you are already inside the content editor and ready to publish, skip ahead to step 6.
Navigate to the template
Select Manage Marketing.
Select Manage Templates.
Select Actions on the piece you want to update.
Select Media Settings.
Select Edit Template.
Upload and publish
Select Unpublish if the piece is currently active.
Select Publish.
Important: Thumbnails must be .jpg files and 3 MB or less.
Select + Upload Custom Thumbnail.
Review the file in the preview to confirm the correct image is selected.
Select Publish Asset.
Select the X to exit the editor.
Confirm that the custom preview and thumbnail image has been updated.
Remove a custom thumbnail
If you need to remove a custom thumbnail, you can do so during the publish flow.
In the Publish Asset dialog, select the X next to the uploaded thumbnail file to remove it. The piece will revert to its automatic thumbnail when you publish.