

This guide shows marketing admins how to use Email Builder Locking to protect compliance-critical content, such as signature disclaimers, so users can personalize and send emails on their own without deleting or changing what's required.
Contents
What locking gives you
- Prevent deletion lock: lock individual elements (Text, Image, Video, Button, BombBomb, Vidyard) and snippet-based blocks (signature and header blocks) so users cannot edit or delete them.
- Element Properties panel: a docked right-side panel that is the home for an item's lock state and its formatting controls (padding, dimensions, color, text formatting, and so on).
- Subject and Preheader locking: Admins can independently lock the Subject and Preheader Text fields in the email Settings. On new emails and templates, both fields default to unlocked.
- Automatic row protection: any layout row that contains at least one locked item cannot be deleted or reordered by users. No separate row lock is needed.
- Visual lock indicators: locked elements, locked blocks, and protected rows show a lock indicator to both admins and users.
- User guidance strip: a sticky message at the top of the canvas, shown to users only, explaining what they can and cannot change.
- Editable indicator: a visual indicator on Email Library thumbnails showing which emails a user is allowed to personalize.
Before you begin
The two workflows: Template Gallery and Email Library
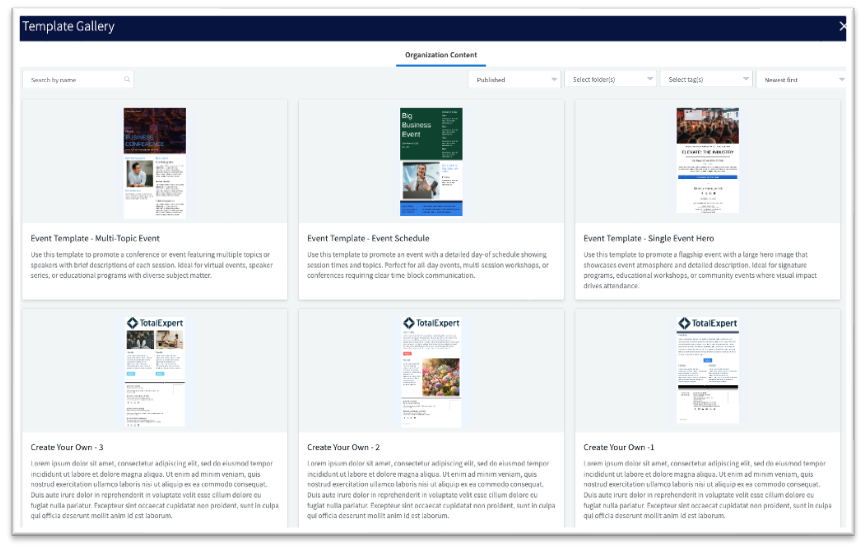
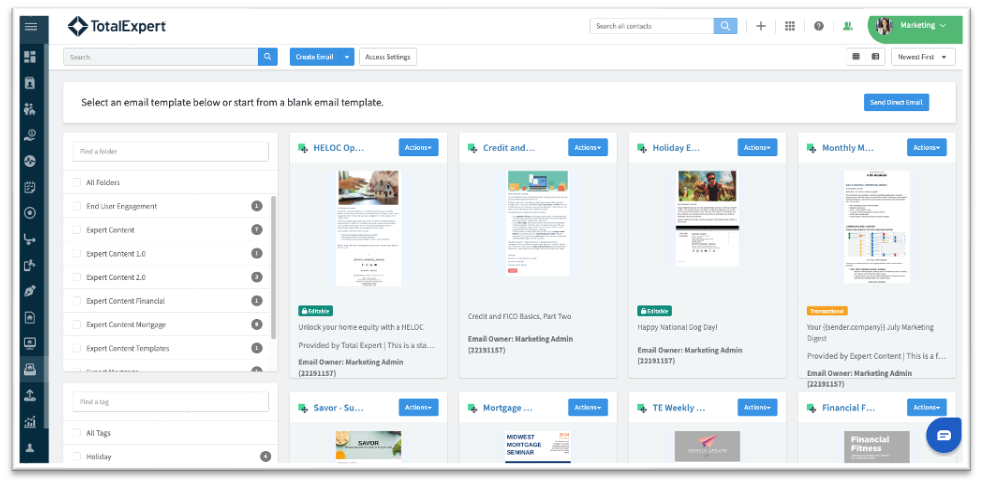
Locking supports two user workflows, and how you publish an email decides which one applies. Publish Template sends the email to the Template Gallery. Publish sends it to the Email Library. Locking behaves the same way in both. What differs is how much unlocked content users can change, and whether they can add new content.
| Capability | Template Gallery | Email Library |
|---|---|---|
| What it is | Reusable templates. A user starts from a template, builds their own email, and can save it as a draft to reuse. | Ready-to-send emails for one-time use. A user opens an email, personalizes it, and sends right away. |
| Edit unlocked content | Yes | Yes |
| Delete unlocked content | Yes | Yes |
| Add new layouts and elements | Yes | No |
| Save as a draft and reuse | Yes | No |
| Change locked content | No | No |
| Change email styling | No | No |
| Setup needed | Your organization requests to turn this on. It is not on by default. See below. | No setup needed. You still give users edit access and lock the content you want protected. |
Turning on the Template Gallery workflow
The Template Gallery workflow gives users more flexibility, but it is not on by default. To turn it on for your users, contact your Total Expert Customer Success Manager, who will route the request to have it configured for your organization. The Email Library workflow needs no setup to enable.
Works alongside your approval flows
Locking works alongside existing approval workflows and does not change or replace them. If you route user emails through an approval flow today, you can keep doing so. Locking adds compliance protection on top.
The Element Properties panel
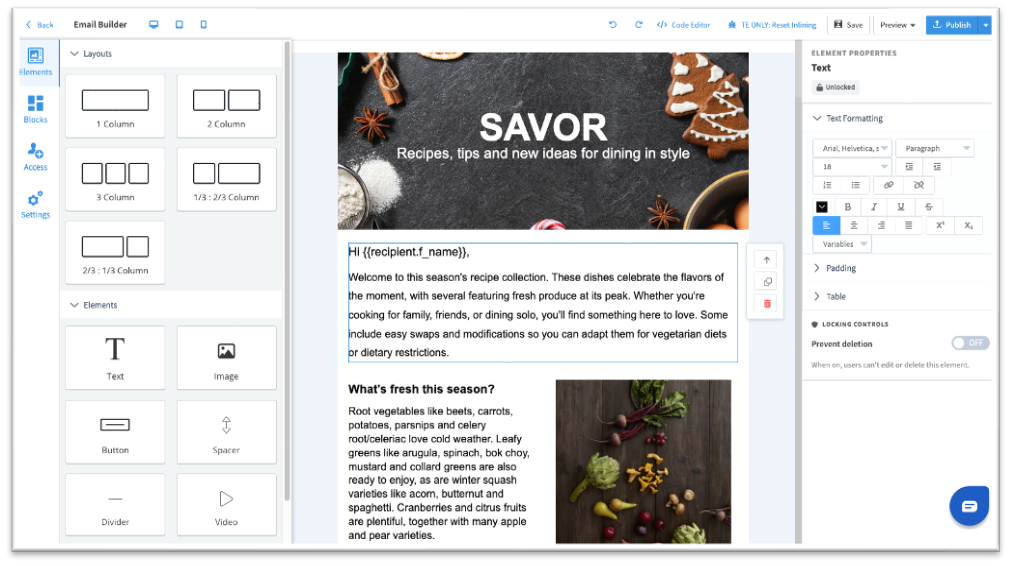
The builder now keeps element controls in a docked Element Properties panel on the right side. This is a change to the builder itself, so it affects everyone in your organization who edits emails — not only when you use locking.
- Element controls that used to appear in floating popovers over the canvas (padding, dimensions, attributes, and text formatting such as font, size, color, and alignment) now live in the Element Properties panel.
- The text formatting toolbar now appears inside the panel, in a Text Formatting section, instead of floating over the canvas. This fixes the toolbar being cut off in narrow 2-column and 3-column layouts.
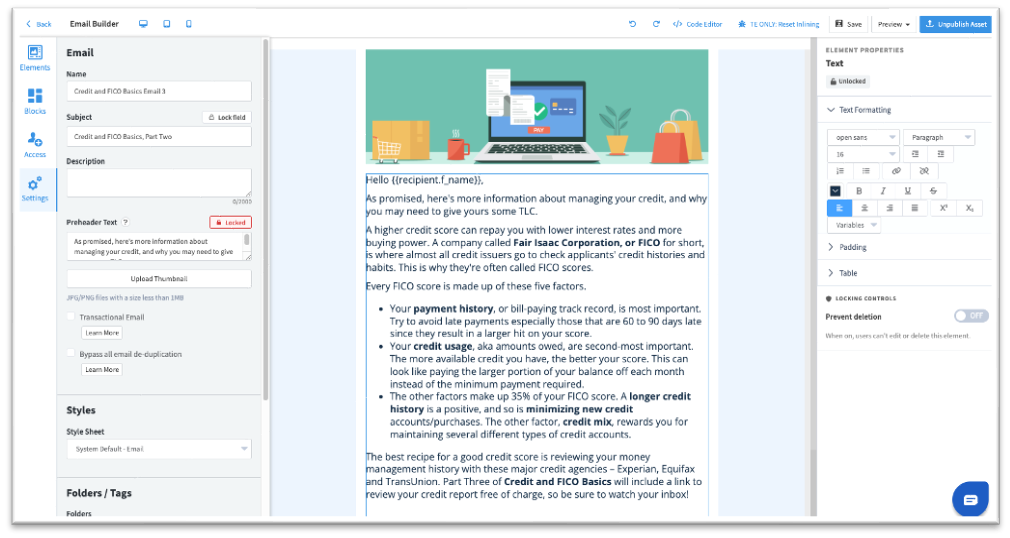
- Locking lives here too. When you select a lockable item, the panel shows a Locking Controls section with the Prevent deletion toggle.
Lock your content
Lock elements and blocks, lock the Subject and Preheader fields, and see how row protection works automatically.
Lock an element or block
Locking an item prevents users from editing or deleting it. Use this for content that must stay intact, such as a signature block, a disclaimer, or a required header.
| 1 | Open the email builder and select the element or block on the canvas. |
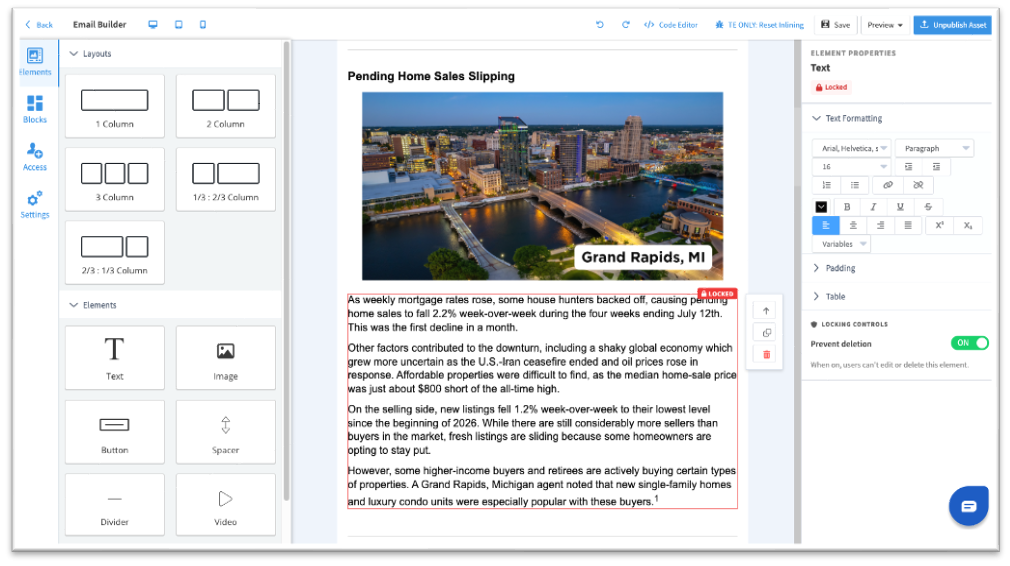
| 2 | In the Element Properties panel on the right, find the Locking Controls section. |
| 3 | Turn on Prevent deletion. A lock indicator appears on the item right away.
|
| 4 | To unlock, turn Prevent deletion off. The item can be edited and deleted again. |
Lock the Subject and Preheader fields
You can lock the Subject and the Preheader Text independently so users cannot change them.
| 1 | Open the Settings tab in the email builder. |
| 2 | Next to the Subject field or the Preheader Text field, use the field lock control. It reads "Lock field" when unlocked and "Locked" once turned on. |
| 3 | Turn the control on to lock the field, or off to unlock it. |
A few things to know about locking these fields:
- On newly created emails and templates, both the Subject field and the Preheader field default to unlocked.
- The email Name field is never lockable and stays editable for everyone.
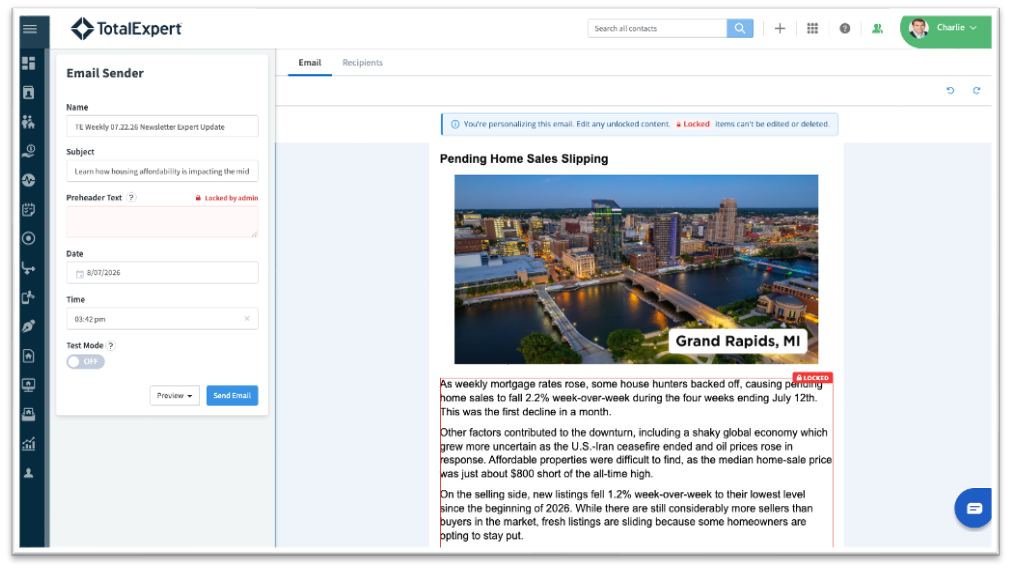
- Locked Subject and Preheader values are read-only for users in both the Settings tab and the Email Sender panel.
How automatic row protection works
You do not lock rows directly. A row is protected automatically based on what is inside it.
- If a layout row contains at least one locked item, users cannot delete or reorder that row, and the row shows a protection indicator.
- If every item in a row is unlocked, users can delete or move the row normally.
- Users can still add or delete unlocked rows above or below a protected row when creating an email from the Template Gallery. That can shift the protected row's position. Locking guarantees the content stays present, not its exact position.
- As an admin, you can delete or reorder any row regardless of lock state.
Publish to your users
Grant edit access for the Email Library, then publish your template or email to the gallery your users will see.
Mark an email as editable (Email Library)
Before users can open and personalize an email you publish to the Email Library, give them edit access. This is what drives the Editable indicator users see on the thumbnail.
There are three ways to grant edit access. Use only one method for a given email or template.
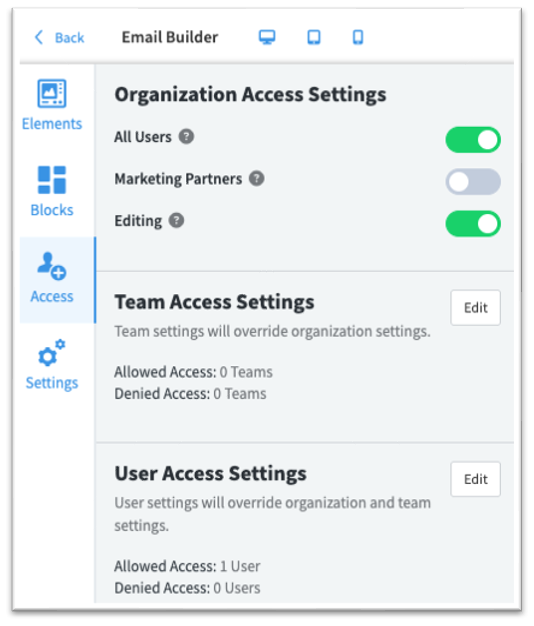
- Organization level: In the Access tab, turn on All Users, then turn on Editing.
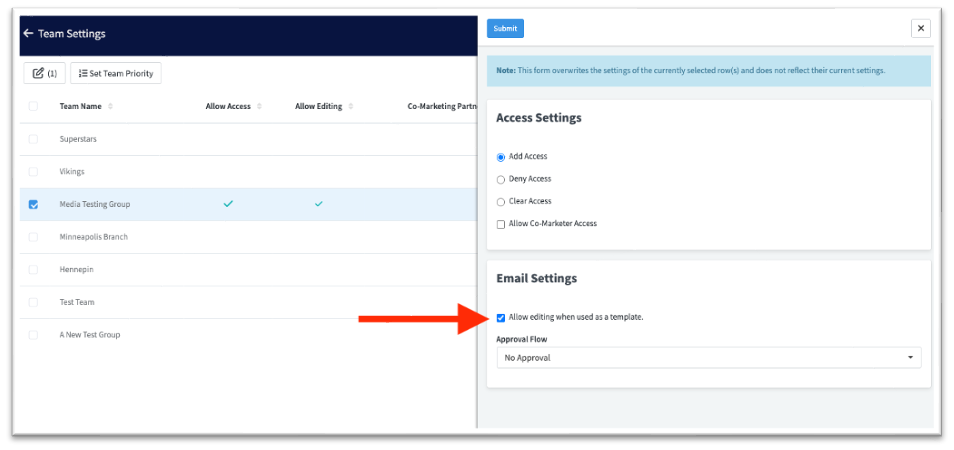
- Team level: In the Access tab, next to Team Access Settings click Edit, choose Add Access, assign the teams, then select "Allow editing when used as a template."
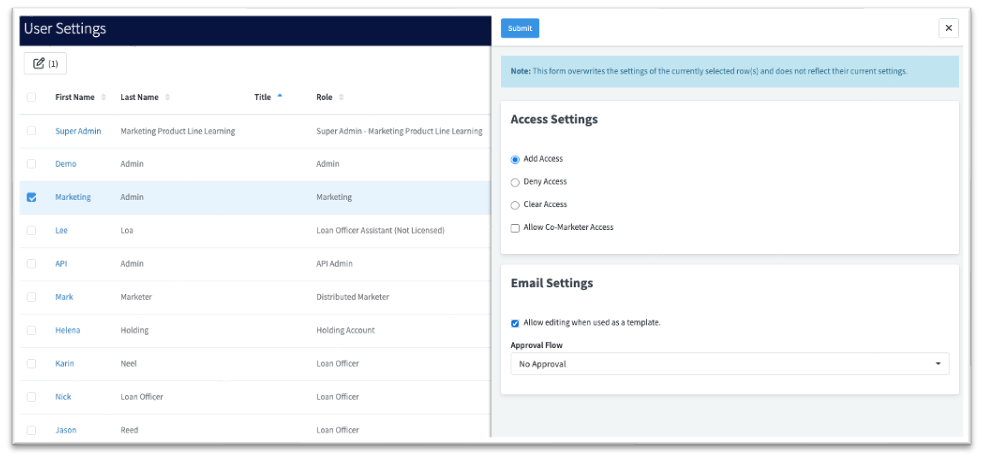
- User level: In the Access tab, next to User Access Settings click Edit, choose Add Access, assign the users, then select "Allow editing when used as a template."
After you set edit access, lock the content that must stay intact (see above), then publish the email to the Email Library.
Publish your template or email
How you publish decides which gallery the email lands in and how much users can change.
- Publish Template: sends the email to the Organization Content tab of the Template Gallery. Users can build their own email from it and save drafts to reuse.
- Publish: sends the email to the Email Library for one-time sends. Users can edit or delete existing unlocked items and send immediately. They cannot add new layouts or elements.
Your lock settings travel with the email through either action.
Publish an email to the Template Gallery
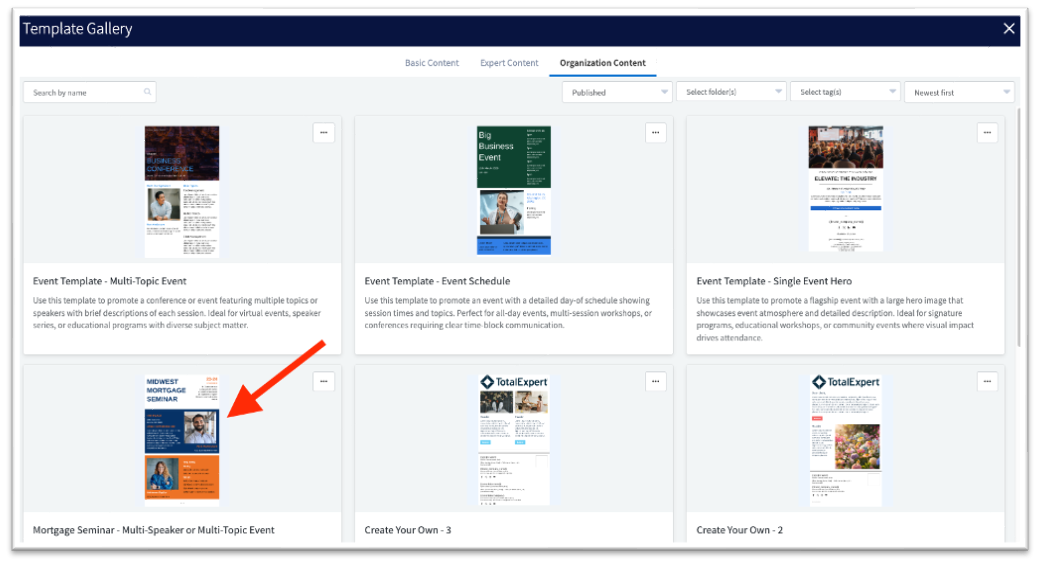
Publishing an email as a template places it in the Organization Content tab of the Template Gallery. Users select it from there, build their own email, and save drafts to reuse. Your locks travel with every copy.
Lock your content and grant edit access first, then follow these steps.
| 1 | Open the email in the email builder. |
| 2 | Select the Access tab, then confirm edit access is set for the users who need the template. See Mark an email as editable above. |
| 3 | Select Save. |
| 4 | Select the arrow next to Publish, then select Publish Template. |
The template now appears in the Organization Content tab of the Template Gallery.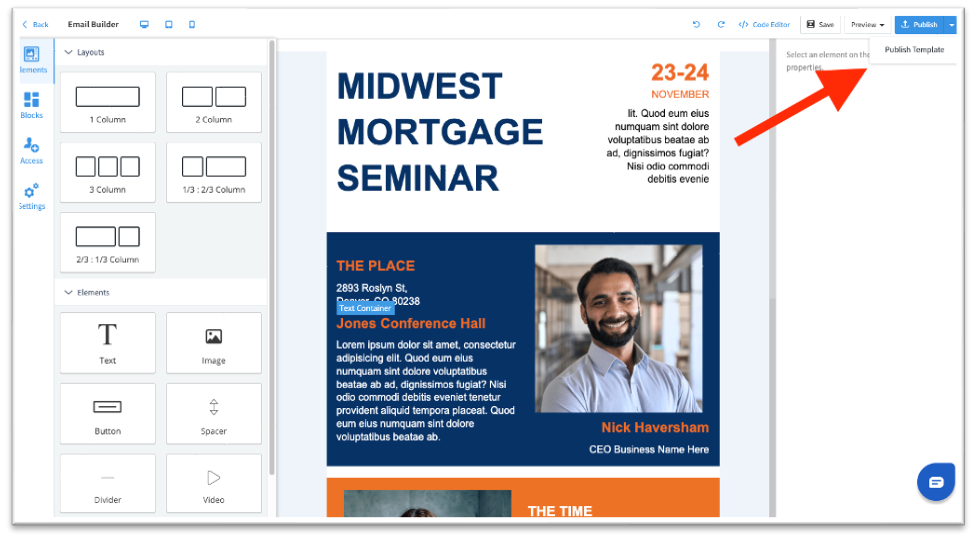
Assign an approval flow to a template
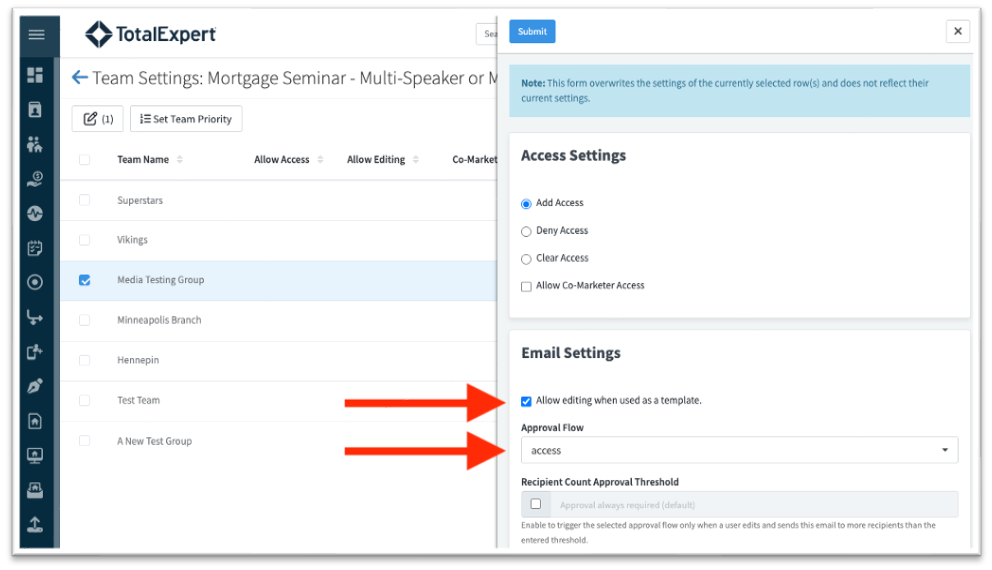
Locking does not change your approval flows, but you can require approval on the emails users send from a template. Set this by team or by user.
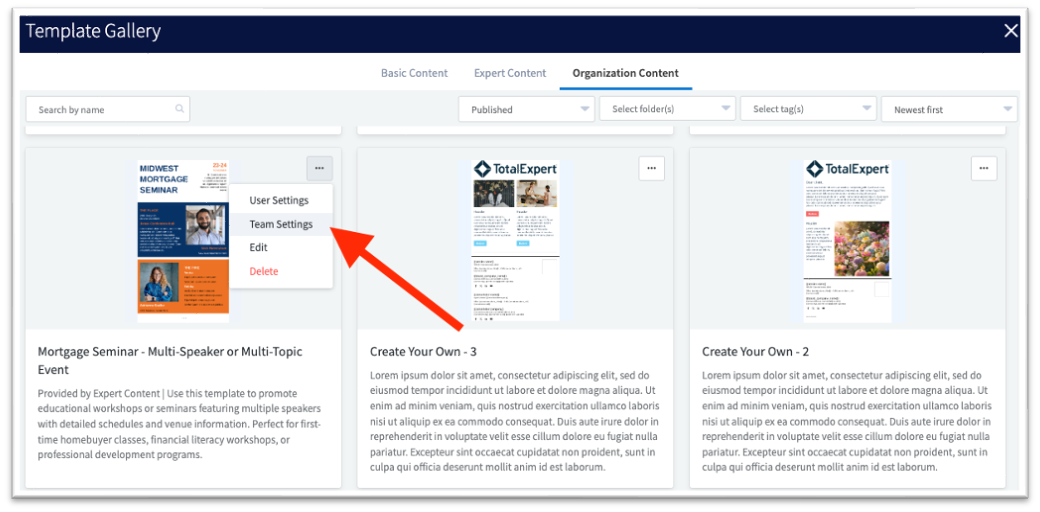
| 1 | Select Create Email, then select the Organization Content tab. |
| 2 | Find your template, select the three-dot menu, then select Team Settings or User Settings. |
| 3 | Under Email Settings, open the Approval Flow list and select a flow. |
What your users see
Guidance strip and lock indicators
- Locked elements and blocks show a lock indicator on the canvas. Protected rows show a distinct row-level indicator.
- Placed blocks such as signatures and headers appear with the label "Row" in the Element Properties panel header.
- Users see a sticky guidance strip at the top of the canvas that reads: "You're personalizing this email. Edit any unlocked content. Locked items can't be edited or deleted." Admins do not see this strip.
Editing behavior
- Locked items show no edit or delete option. The action rail (select parent row, duplicate, delete) and the formatting controls are hidden on locked items, so there is nothing to click and no error message appears.
- Unlocked items can be edited and deleted normally.
- Template Gallery: users see only the Organization Content tab. They can add new layouts and elements from the Elements tab. The Blocks tab and the Styles section are hidden. The Name, Subject, and Preheader settings remain available.
- Email Library: users can edit or delete existing unlocked items but cannot add new layouts or elements. Locked items cannot be changed.
Email Library Editable indicator
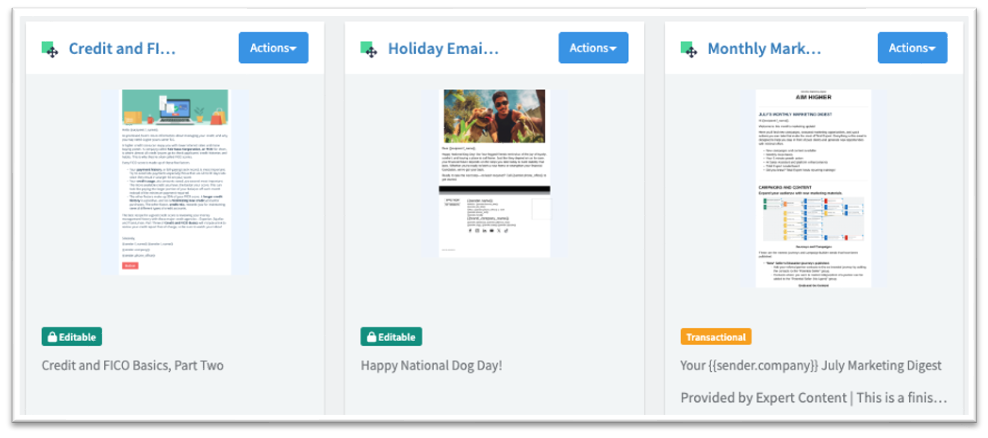
- Email Library thumbnails show an Editable pill, with a lock icon, on emails a user is allowed to personalize. Emails that are not editable do not show the pill.
- The pill is visible to both admins and users, reflects your edit-access settings rather than changing them, and applies to the Email Library only. Template Gallery items are always editable.
Troubleshooting
| Symptom | What to check |
|---|---|
| You do not see the Prevent deletion toggle or the Subject and Preheader lock controls. | Confirm your account has the admin (template-publishing) permission. Users do not see lock controls by design. |
| The Prevent deletion toggle is missing on a specific item. | Confirm the item is a lockable type. Spacer, Divider, and layout rows do not have the toggle. Rows are protected automatically instead. |
| A user cannot edit or delete something they expected to change. | The item is locked, or it sits in a protected row. Unlock it in the Element Properties panel. |
| A user deleted an unlocked element in the Email Library and cannot get it back. | The Email Library workflow has no controls for adding elements. Have the user click Undo to restore it. They may need to click Undo more than once. |
FAQs
Can users now build their own emails safely?
Yes. You lock compliance-critical content, such as the signature and disclaimer, so users can personalize and send without deleting it.
What happens if a user tries to delete or edit locked content?
They cannot. Locked items have no edit or delete option, and a row that contains locked content cannot be deleted or moved.
What happens if a user accidentally deletes an unlocked element in the Email Library?
They can't add it back, since the Email Library workflow has no controls for adding elements. They can recover it with the Undo button, though they may need to click it more than once.
Why can't users change the email styling or add saved blocks?
In the Template Gallery, the Styles section and the Blocks tab are hidden from users to protect brand consistency.
Does this change our approval workflows?
No. Locking does not change or interact with approval workflows.
Why does the email builder look different, and where did the floating formatting controls go?
The element controls (padding, color, text formatting, and so on) now live in a docked panel on the right side of the builder instead of floating over the canvas. This applies to all email editing in your organization, not only to locked content. The controls work the same way as before.